Science Teaching & Technology by Multimedia Science
Why I Started Creating & Using Computer Based Simulation Labs
The Good, The Bad, and The Ugly
Terminal Velocity Lab – The Good & The Bad
For many years I had students run a lab to find the terminal velocity of equally sized spheres of different materials. It was an excellent hands-on lab for the students which led to a good understanding of both the concepts of and finding of terminal velocity and was one of my favorites.
However, there were difficulties associated with the set-up, running, and results of this lab as follows (see schematic below):
- The equipment setup was tedious and time consuming, both for me and the students
- There were lots of pieces to store, unpack, and lay out including a 6 foot glass tube, not to mention the storage requirements.
- Students had to set up two photo-gate timers precisely with several ring stand holders that tended to slide and twist to make that difficult. Again, this was time consuming.
- The data was not always very accurate leading to graphs that were difficult to analyze
- When the balls were dropped into the glass tube, they would actually bounce back and forth against the sides. This turned out to only be a problem for the lighter balls, like the Styrofoam ball. It was found that when the ventilators were on, the lighter balls were affected by the air currents.
- Students found it very hard to drop the balls close to the top of the glass tubes, since they were standing on the desks and the tubes were above their heads.
- Heavy balls that were dropped, occasionally, would bounce up and break the bottom of the glass tubes.
- The glass tubes were replaced with plastic tubes but these became cloudy over time and slits had to be cut to make the photo-gate timers work.
- Due to the set-up time and other difficulties, it was difficult to predict the timing and when to schedule the computer lab for students to evaluate the data
Even considering all of this, I persisted with a lot of effort, in running this lab successfully for many years.
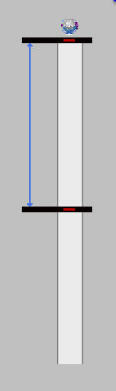
Terminal Velocity Lab Setup Schematic
Course Scheduling – The Ugly
As a former engineering graduate, I found that I had enough college credits to be certified in Physics, Chemistry, and Mathematics. This was great for finding a job and allowed me to teach a number of subjects so as not to become bored. BUT, over a number of years, I found myself the “fixer.” Everyone’s schedule would be determined and I would fill in and cover what was left. This led to having several new preps each year.
OK, that made life pretty difficult, but along with that, I often was teaching out of a number of different classrooms, not necessarily on the same floor or in the same part of the building. I tried to make the Terminal Velocity Lab work for the first year. Imagine me wheeling a cart around the hallways with large glass tubes hanging out the front and back through a teeming hallway of teenagers. And each room often had certain idiosyncrasies that made the setup of equipment even more challenging or exciting, take your pick.
Clickteam Authoring Software – The Good
For many years, I had been working on creating game, demonstration, and simulation software using an authoring program called Multimedia Fusion or now Clickteam Fusion. That summer I set out to reinvent the Terminal Velocity Lab.
Creating the lab in software form was quite challenging. I wanted the computer based lab to be as close to real life as possible and I had to make an acceleration of gravity engine that could be tweaked to simulate the effects of air resistance. After two years of writing, testing, and re-writing, the software was completed.
To make it as real life as possible, students had to:
- Drag the ball to the top of the tube
- Not hit the top of the tube
- Drop the ball within a small distance from the top of the tube
- Drop the ball down the center of the tube
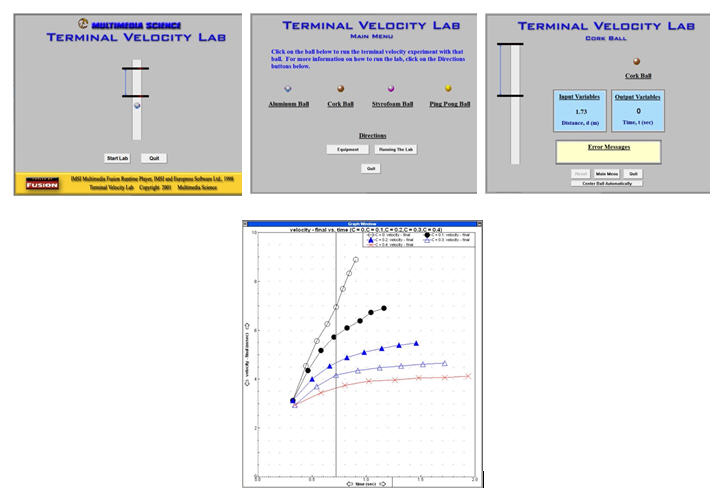
The Final Computer Lab – Even Better
The final lab guaranteed that students got good data since the program would not let them make mistakes like dropping the ball too high above the top photo-gate. The program just made them do it again.
And I learned something also. Since I programmed that small distance within which the ball needed to be dropped, the data was not perfect. There was still error that showed up when the data was graphed. I felt that was one sign of a good simulation.
Over the years since then, I continued to use the software based Terminal Velocity Lab even when I had my own classroom. I ran plenty of hands on labs but both I and the students liked this simulated lab and it worked as well as the original.
The Terminal Velocity Lab software is available at Teachers Pay Teachers or at TES.
There is now both a PC version and a PC & MAC Flash version. Some screen shots are shown below.